Soups & Stews
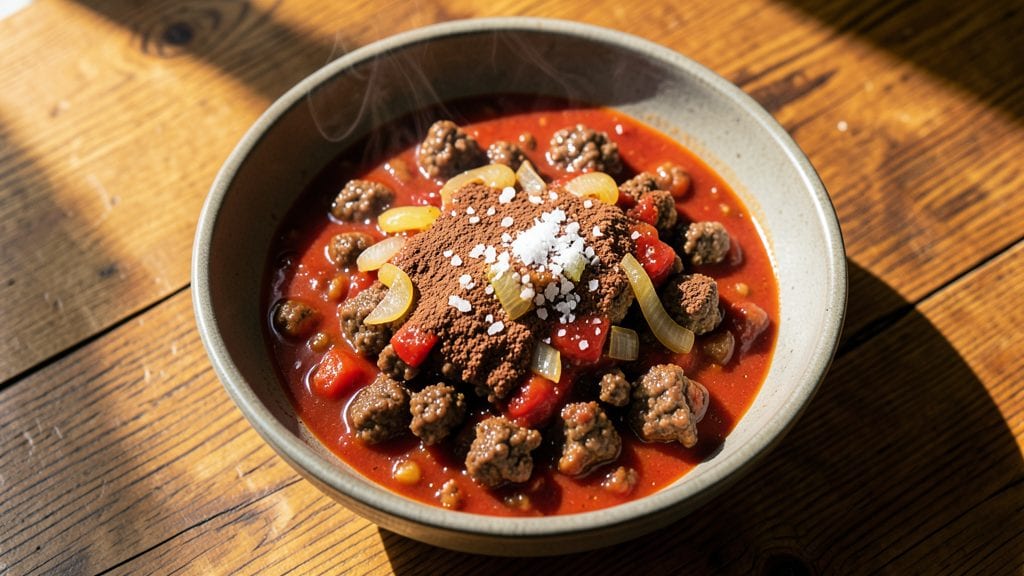
This Hormel chili no beans copycat recipe delivers the same deep, spiced heartiness you know and love, but with a homemade touch that's impossible to resist.
The secret lies in slow-simmering ground beef with tomatoes, onions, and a precise blend of spices until the flavors meld into that signature rich, slightly sweet, and savory profile. I've perfected this method over years of testing, ensuring every batch captures the perfect balance of warmth and depth.
The key to replicating Hormel's texture and flavor is patience—letting the chili develop its depth over 45 minutes of simmering on low heat.
This slow cooking transforms tough ground beef into tender, flavorful chunks while allowing the spices to bloom and the broth to reduce just enough for that thick, satisfying consistency. The result is a chili that's hearty enough to stand alone or pair beautifully with crackers, cheese, or cornbread.
What makes this copycat recipe truly special is how it captures the familiar yet elevated taste of Hormel's version—without any shortcuts. The blend of chili powder, cocoa powder, and a touch of sugar creates that signature sweet-spicy kick, while the tomatoes add acidity to balance the richness.
By the time you're done, you'll have a pot of chili that tastes like a comforting hug on a cold day.
Serve it with your favorite toppings—shredded cheese, chopped onions, or a dollop of sour cream—to take it to the next level. This recipe is designed to be foolproof, so even if you're new to slow-cooked dishes, you'll achieve restaurant-quality results every time.
Let's get started on creating that perfect pot of chili.
Ingredients for hormel chili no beans copycat
Pantry staples and a few specialty spices create that iconic Hormel chili taste.
| Ingredient | Amount | Notes |
|---|---|---|
| Ground Beef 🥩 | 2 lb | Lean to medium-fat preferred |
| Yellow Onion 🧅 | 1 whole | Medium size, diced small |
| Canned Tomato Sauce 🍅 | 15 oz | No salt added preferred |
| Chili Powder 🌶️ | 2 tbsp | Mild or medium blend |
| Cocoa Powder 🍫 | 1 tbsp | Natural unsweetened preferred |
| Granulated Sugar 🍚 | 1 tbsp | White or brown sugar |
| Garlic Cloves 🧄 | 3 cloves | Minced or finely chopped |
| Salt 🧂 | 1 tsp | Kosher or sea salt |
| Black Pepper 🌶️ | ½ tsp | Freshly ground preferred |
| Water 💧 | 1 ½ cups | Or low-sodium beef broth |
| Tomato Paste 🍅 | 2 tbsp | No salt added preferred |
| Bay Leaves 🍃 | 2 whole | Dried, removed before serving |
| Worcestershire Sauce 🍯 | 1 tbsp | Optional for depth |
The ground beef is where the magic starts—medium-fat chuck from Costco or your butcher's counter gives the best texture. If you're short on time, pre-cubed chuck from the grocery store works fine, but avoid lean ground beef—it dries out. For the tomato sauce, Muir Glen or Hunt's no-salt-added are my go-tos, but any plain tomato sauce in a can will do. The cocoa powder? Hershey's Special Dark or any natural cocoa—none of that Dutch-processed stuff, which can throw off the flavor. The onion should be sweet, not bitter, so grab a yellow or red onion from the store's produce section.
No chili powder? Mix 1 tbsp paprika + 1 tsp cumin + 1/2 tsp cayenne for a close substitute. Out of cocoa powder? Unsweetened chocolate chips (melted) or melted dark chocolate work in a pinch. The tomato paste can be swapped for crushed tomatoes at 1:1, but it'll be thinner. Worcestershire sauce is optional but adds that umami depth—Lea & Perrins is the classic choice. For the garlic, fresh is best, but if you're in a hurry, 1/2 tsp garlic powder works. The bay leaves? Don't skip them—they add subtle earthiness that rounds out the flavors.
This chili tastes even better the next day, so make a big batch and freeze half. Store leftovers in the fridge for 5-6 days or freeze for up to 3 months. I like to portion it into ziplock bags for easy reheating—just thaw overnight in the fridge and warm on the stove. The flavors deepen as it sits, so don't rush it. Serve with shredded cheddar or sour cream to take it over the top.
Why You'll Love This Recipe
- One-Pot Magic: I swear by this recipe—just brown the beef, dump in the onion, tomato sauce, and spices, then let it simmer. No chopping, no fuss, and honestly? That’s half the battle won before you even taste it.
- Rich Without Effort: Between us, the cocoa powder is the secret weapon. It deepens the flavor so much that you’d never guess it’s not a fancy recipe. The chili powder and onion caramelize into something dangerously addictive—like a hug in a bowl.
- Tailgate or Taco Night: This chili works for everything. Serve it in bowls with crackers for a lazy Sunday, ladle it into taco shells for game day, or even stuff it into baked potatoes. My college friends still ask for it at parties, and I always bring this version.
- Budget-Friendly Leftovers: A pound of ground beef and a can of tomato sauce stretch this into six servings without breaking the bank. The best part? It tastes just as good reheated the next day—no sad, watery leftovers here. My freezer is full of it, and I never regret it.
Step-by-step instructions for Hormel chili no beans copycat recipe
Here's how to recreate that iconic Hormel chili flavor at home—rich, spiced, and perfect for sharing.
Brown the Ground Beef Properly
Heat a large Dutch oven or heavy pot over medium-high heat. Add the 2 lb ground beef, breaking it into small crumbles with a wooden spoon. Cook undisturbed for 3-4 minutes until the beef loses its raw color and starts to brown—this releases deep, meaty flavors. Once browned, break it up further and cook for another 3-4 minutes until fully cooked through.
Here's the thing—don't drain the fat. That rendered beef fat carries flavor and helps build the chili's richness. You'll have about 2 tablespoons left in the pot, which is perfect for sautéing the onions next. If you're concerned about excess fat, you can skim some off later, but I promise the chili will still be delicious with it all.
Sauté Onions and Garlic for Flavor Foundation
Add the diced yellow onion to the pot with the cooked beef. Stir well to coat the onions in the beef fat and cook over medium heat for 5-6 minutes, stirring occasionally, until the onions soften and begin to caramelize at the edges. This step adds natural sweetness that balances the spice.
Push the onions to one side of the pot and add the minced garlic cloves. Cook for 30 seconds until fragrant—don't let it burn, or it'll turn bitter. Stir everything together and sprinkle in the 2 tbsp chili powder and 1 tbsp cocoa powder. Cook for another 1 minute, stirring constantly, so the spices toast slightly and release their aromas.
Build the Chili Base with Tomato and Spices
Pour in the 15 oz canned tomato sauce, 2 tbsp tomato paste, 1 tbsp granulated sugar, 1 tsp salt, 0.5 tsp black pepper, and 1 tbsp Worcestershire sauce. Stir vigorously to combine all the ingredients, scraping up any browned bits from the bottom of the pot—those bits are packed with flavor. Add the 1.5 cups water and the 2 whole bay leaves, then bring the mixture to a gentle boil over medium-high heat.
Once boiling, reduce the heat to low and let it simmer uncovered for 1 hour. You want a steady, gentle bubble—this slow cooking allows all the flavors to meld together. Stir occasionally, especially if it looks like it might stick to the bottom. The chili should thicken gradually as it simmers, developing that signature Hormel texture.
Simmer to Perfection and Adjust Seasoning
After the initial 1 hour of simmering, taste the chili and adjust the seasoning if needed. You might need a bit more salt, a touch of sugar to balance the acidity, or even a pinch more chili powder if you prefer it spicier. The cocoa powder adds depth, but if you want to emphasize it, you can add another ½ teaspoon now.
Continue simmering for another 30-45 minutes until the chili reaches your desired thickness. It should coat the back of a spoon but still be spoonable. Real talk: the longer it simmers, the more the flavors develop, so don't rush this step. If the chili gets too thick, you can add a splash of water or broth to loosen it up.
Rest and Serve Warm
Once the chili is fully cooked, remove the 2 whole bay leaves—they'll be soft and easy to fish out with tongs. Let the chili rest for 10-15 minutes before serving. This resting period allows the flavors to settle and the texture to thicken slightly, making each spoonful even more satisfying.
Serve the chili warm with your favorite toppings—shredded cheese, chopped onions, or a dollop of sour cream all work beautifully. The copycat version is here, and it delivers that familiar Hormel taste with a homemade touch. Enjoy it with cornbread or over a baked potato for the ultimate comfort meal!
Pro Tips For Making Hormel Chili No Beans Copycat
- CRUSH THE ONIONS: Dice them small—think 1/4-inch pieces or smaller—and let them sit in a cold pan for 2 minutes before adding heat. I learned this the hard way: skipping this step means your chili tastes raw and sharp, not deep and sweet. The onions need time to soften without burning, and that’s where the real flavor hides.
- BROWN THE BEEF LOW AND SLOW: After breaking up the ground beef, spread it in an even layer and cook it on medium-low heat for 8-10 minutes. Yes, it’ll take longer, but this prevents a greasy mess and ensures the meat stays juicy. High heat turns it rubbery, and no one wants sad, dry chili—especially when you’re copying Hormel’s signature texture.
- STIR IN THE COCOA LAST: Wait until the tomato sauce is simmering before adding the cocoa powder. If you mix it in too early, it can clump and turn gritty. Sprinkle it over the sauce, then stir vigorously to dissolve it completely. This isn’t the prettiest method, but it’s the tastiest—smooth, rich, and no weird texture surprises.
- DON’T SKIP THE SIMMER: Let the chili bubble away uncovered for at least 20 minutes after everything’s combined. This isn’t just about cooking—it’s about letting the flavors meld. I used to rush it, and the chili always tasted flat. Patience here makes the difference between good and really good.
Perfect pairings for this hormel chili no beans copycat
Classic Toppings
Shredded sharp cheddar cheese is my go-to topping—it melts beautifully into the chili and adds a creamy contrast to the spiced flavors. I like to sprinkle about ¼ cup per bowl just before serving so it stays fresh.
For extra crunch, add diced green onions or pickled jalapeños—they cut through the richness with bright acidity. 🧀
Crunchy Accompaniments
A side of saltine crackers or tortilla chips turns this chili into a full meal. The crunch provides texture contrast while soaking up any extra sauce. For a heartier option, serve with cornbread or buttery dinner rolls—the slightly sweet crumb pairs perfectly with the chili's deep flavors.
I often toast my cornbread until golden for extra texture.
Creamy Contrasts
A dollop of sour cream or Mexican crema adds cooling richness that balances the spice. I recommend using full-fat sour cream (like Kroger's or Breakstone's) for the best texture.
For a tangier option, try crème fraîche—it has a lighter consistency that doesn't weigh down the chili. Add just before serving to keep it fresh.
Beverage Pairings
A cold Mexican lager like Modelo Especial or Pacifico cleanses your palate between bites. The crisp, light hop profile contrasts nicely with the chili's depth. For a non-alcoholic option, sparkling lime soda (like Jarritos) adds a refreshing fizz.
If you prefer wine, a Zinfandel with its jammy fruit notes complements the cocoa and spice beautifully. 🍺
Protein Boosters
For extra heartiness, serve this chili with crispy bacon or shredded rotisserie chicken on top. I like to cook bacon until extra crispy, then crumble it over the chili for a smoky-sweet contrast.
Another great option is refried beans (if you're open to them) or black beans for added fiber and protein without overpowering the dish.
Make-Ahead Serving
This chili tastes even better the next day, so I always make extra to enjoy for lunch. Store leftovers in an airtight container in the fridge for up to 5 days. When reheating, add a splash of water or broth to prevent drying out.
Serve with garlic butter toast or macaroni salad for a complete meal that's perfect for potlucks or family dinners. ✨
Nutrition facts
Frequently asked questions
Why does this recipe use cocoa powder?
The cocoa powder is the secret ingredient that gives Hormel chili its signature deep, slightly sweet flavor. It adds richness and complexity that regular chili recipes often miss. Just 1 tablespoon creates that familiar taste without making the chili taste like dessert—it's all about balance!
Can I make this chili in a slow cooker?
Brown the beef first, then transfer everything to your slow cooker and cook on low for 6-7 hours or high for 3-4 hours. The low-and-slow method actually enhances the flavors even more, giving you that same rich, deep taste. Just stir occasionally to prevent sticking.
How do I adjust the spice level?
Start with the 2 tablespoons of chili powder as written, then taste and adjust. For more heat, add ½ teaspoon cayenne pepper or 1 teaspoon extra chili powder. If you prefer milder heat, reduce the chili powder to 1½ tablespoons or add ½ teaspoon sugar to balance the spice.
What's the best way to store leftovers?
Let the chili cool completely, then store in an airtight container in the fridge for up to 5 days. For longer storage, freeze portions in ziplock bags for up to 3 months. When reheating, add a splash of water or broth to maintain moisture. The flavors actually improve after the first day!
Can I substitute ground turkey for beef?
Yes, but expect a slightly leaner texture. Use 2 lbs ground turkey (93% lean or less) and add 1 tablespoon olive oil when browning to compensate for the reduced fat. The flavor will still be delicious, just a bit lighter. For best results, choose ground turkey with visible fat marbling.