
Side Dishes
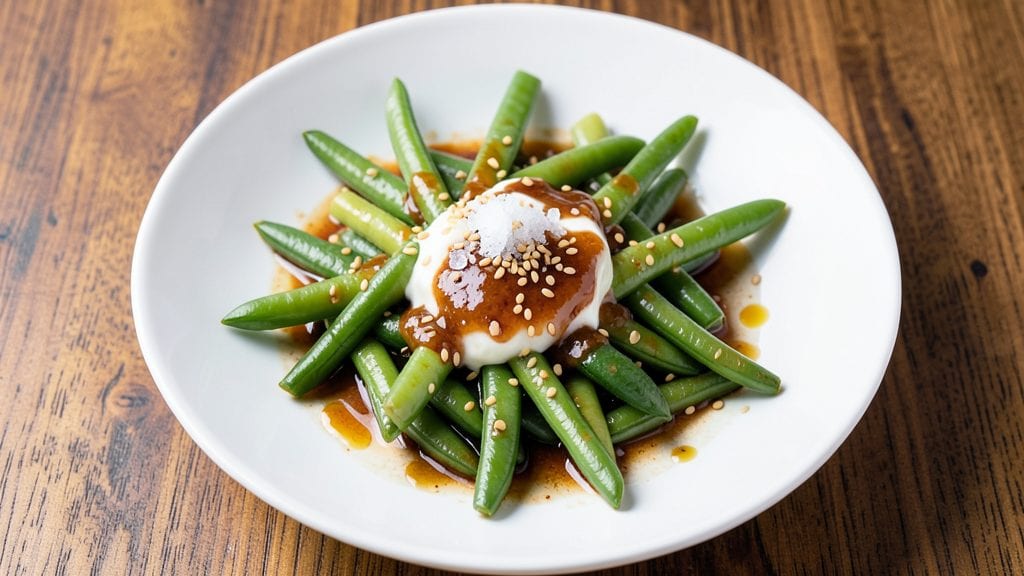
This miso green beans recipe transforms simple green beans into a restaurant-worthy side dish with deep umami flavor and satisfying crunch in just 15 minutes.
The secret lies in balancing white miso’s salty richness with a touch of sweetness and acidity, creating a glaze that caramelizes beautifully while keeping the beans tender-crisp. I developed this recipe after realizing how often green beans get overlooked in favor of heavier sides—until you taste this version.
The process is straightforward but precise: blanching the beans first ensures they stay vibrant and crisp-tender, while the miso glaze adds a savory depth that elevates any meal. A splash of rice vinegar brightens the flavor, and a drizzle of sesame oil adds nutty warmth.
The result is a dish that’s foolproof, visually striking, and packed with umami—perfect for pairing with grilled proteins or tofu.
What makes this recipe stand out is how it delivers restaurant-quality results without requiring advanced techniques. The beans develop a glossy sheen from the glaze while maintaining their natural snap, and the aroma alone will have everyone at the table asking for seconds.
Whether you’re serving it as a side or a light main, this dish proves that simple ingredients can create extraordinary flavor.
For best results, use fresh green beans and adjust the glaze to taste—more miso for extra umami, or a pinch of sugar if you prefer a touch of sweetness. The recipe scales easily, so it’s ideal for meal prep or entertaining. Let’s get cooking!
Ingredients for miso green beans
Fresh green beans and umami-rich miso transform into a restaurant-quality side dish with just 12 ingredients.
| Ingredient | Amount | Notes |
|---|---|---|
| Fresh Green Beans 🌽 | 1 ½ lb | Trimmed, ends removed |
| White Miso Paste 🍶 | 2 tbsp | High-quality, unsweetened |
| Rice Vinegar 🍶 | 1 tbsp | Unseasoned, mild flavor |
| Sesame Oil 🫒 | 1 tbsp | Toasted, for aroma |
| Granulated Sugar 🍬 | 1 tsp | Balances miso saltiness |
| Toasted Sesame Seeds 🌾 | 1 tbsp | For garnish, optional |
| Vegetable Oil 🫒 | 1 tbsp | For blanching beans |
| Salt 🧂 | ½ tsp | Kosher or sea salt |
| Garlic Cloves 🧄 | 2 cloves | Minced, optional |
| Ginger Root 🌿 | 1 tsp | Freshly grated, optional |
| Water 💧 | 2 cups | For blanching |
| Ice Cubes ❄️ | 1 cup | For shocking beans |
The quality of miso makes all the difference here. White miso provides that clean, savory depth without overpowering, but red or awase miso works too if you prefer a deeper flavor. For the best results, grab Koda Farms or Hikari from the Asian market—both brands offer consistent quality. Fresh green beans are a must; harvest-tender or snap beans hold their crunch best. If you can't find them, regular green beans work, but trim the ends carefully. The garlic and ginger are optional but add layers of warmth—Trader Joe's sells pre-minced jars if you're short on time, though fresh is always better.
No white miso? Substitute with 1 tbsp soy sauce plus 1 tsp sugar—it won't be identical, but it'll get you close. Running out of rice vinegar? Apple cider vinegar or lemon juice works in a pinch, though the flavor profile shifts slightly. Sesame oil is non-negotiable for that nutty aroma, but if you're avoiding it, toasted peanut oil adds a similar depth. The sugar can be swapped for maple syrup or agave if you're avoiding refined sugar. For the garlic and ginger, garlic powder and ground ginger work at half the amount, but fresh is ideal for that bright punch.
Blanched beans keep for 3-4 days in the fridge if stored in ice water, but the glaze is best made fresh. The miso glaze itself stores for up to 1 week in the fridge—just reheat gently before using. For meal prep, blanch and shock the beans ahead, then toss with the glaze right before serving to maintain that satisfying crunch. The sesame seeds add texture, but if you're skipping them, a sprinkle of crushed peanuts or toasted pumpkin seeds works too.
Why You'll Love This Recipe
- I’ll be real: this recipe saves me on grocery days. Green beans are cheap, miso lasts forever, and a splash of vinegar and sugar? That’s basically a flavor upgrade for any meal. Plus, leftovers? They taste even better the next day.
- No-Chop Needed: I swear by this—just trim the ends and snap those green beans in half. The miso paste does all the work, turning them into something rich and savory without a single knife scrape.
- Umami Bomb: That white miso paste? It’s the star. One spoonful of it melts into the beans, giving them this deep, salty-sweet glow that makes them taste like they’ve been simmering for hours—even though it’s 20 minutes of active time.
- Lunchbox Hero: Between us, this is my go-to for packed lunches. The sesame oil adds a little nutty kick, and the rice vinegar keeps it bright enough to not taste like last night’s dinner. My kids eat it cold, straight from the fridge—no complaints.
Step-by-step instructions for miso green beans
Here's how to transform simple green beans into a restaurant-worthy dish with bold umami flavor.
Blanch the Green Beans for Crisp-Tender Texture
Fill a large pot with the 2 cups of water and bring to a rolling boil over high heat. While waiting, trim the 1.5 lb of fresh green beans by snapping off the ends where they naturally bend. You want pieces about 3 inches long for even cooking.
Once boiling, add the green beans and cook for exactly 3 minutes. You'll notice they'll float to the surface as they blanch. Immediately drain them in a colander and transfer to a large bowl. This quick cooking preserves their vibrant green color and creates the perfect foundation for crisp-tender texture.
Shock with Ice Water to Preserve Color and Crunch
Add the 1 cup of ice cubes to the bowl with the blanched green beans. Stir gently to distribute the ice evenly. The temperature drop stops the cooking process instantly, locking in their bright green color and crisp texture. Let them sit for 2 minutes while you prepare the miso sauce.
This shocking step is crucial—it prevents the beans from becoming mushy while keeping their vibrant appearance. The ice water also helps remove any surface starch that could make the beans gummy when tossed with the sauce later.
Create the Miso Sauce with Balanced Flavors
In a small saucepan, combine the 2 tbsp of white miso paste, 1 tbsp of rice vinegar, 1 tbsp of sesame oil, 1 tsp of granulated sugar, 0.5 tsp of salt, the 2 cloves of minced garlic, and 1 tsp of freshly grated ginger root. Whisk over medium-low heat until the mixture reaches 160°F, about 3-4 minutes. You'll notice the miso will dissolve completely and create a smooth, glossy sauce.
The sugar balances the saltiness of the miso while the vinegar adds brightness. The garlic and ginger provide aromatic depth that complements the earthy umami. Keep the heat low to prevent the sesame oil from smoking—you want to preserve its delicate nutty aroma.
Toss Beans with Sauce for Perfect Coating
Drain the green beans thoroughly in a colander, shaking gently to remove excess water. Transfer them to a large bowl and pour the warm miso sauce over the top. Using clean hands or tongs, toss the beans gently but thoroughly to ensure even coating. You should see the beans glisten with the sauce as they absorb the flavors.
Work quickly but carefully—this is when the magic happens. The residual heat from the sauce will finish cooking the beans slightly, creating that perfect al dente texture. If the sauce seems too thick, add 1 tsp of water at a time until it reaches a glossy, clinging consistency.
Finish with Toasted Sesame Seeds and Serve Immediately
Transfer the coated green beans to a serving platter and sprinkle with the 1 tbsp of toasted sesame seeds. Toss gently to distribute them evenly. The seeds add a final textural contrast and visual appeal. Serve immediately while the beans are still warm and the sauce is glossy.
Each bite should deliver the perfect balance of umami from the miso, brightness from the vinegar, and subtle heat from the ginger. The beans should be crisp-tender with a satisfying crunch, not mushy. This dish pairs beautifully with grilled proteins or as a standalone vegetarian entrée.
Pro Tips For Making Miso Green Beans
- TRIM BEANS LENGTHWISE: Fresh green beans need to cook evenly, and cutting them into 2-inch pieces is standard—but if you want that restaurant-style look, trim the ends and cut them into 1.5-inch lengths. I learned this the hard way when my beans turned mushy because the thicker ends took too long to cook through.
- DILUTE MISO FIRST: White miso paste is thick and stubborn. Instead of scraping it directly into the pan, mix 1 tablespoon with 2 tablespoons of hot water or rice vinegar first—this creates a smooth paste that won’t clump. After burning three batches trying to scrape miso off the bottom, I finally realized this is the only way to avoid a gritty, uneven sauce.
- DON’T RUSH THE VINEGAR: Add rice vinegar at the very end, just before serving, and let the beans sit for 30 seconds. The acid needs time to brighten the flavors and mellow the miso’s saltiness. I used to toss it in early, and the dish always tasted flat—like someone forgot to finish the recipe.
- TOAST SESAME OIL SEPARATELY: Sesame oil burns faster than you think. Warm it in a small pan over low heat for 20 seconds until it smells nutty, then drizzle it over the finished beans. This keeps the aroma intact and prevents that bitter, scorched taste that ruins the whole dish. (Yes, even if you’re impatient like me.)
Best sauces and condiments for this recipe
Miso-Glaze Foundation
The core sauce in this recipe is all about balancing white miso's deep umami with bright acidity. I start with 2 tbsp white miso paste (like Koda Farms) combined with 1 tbsp rice vinegar and 1 tbsp toasted sesame oil—this trio creates the perfect flavor base.
The 1 tsp granulated sugar prevents the miso from becoming overly salty, while ½ tsp kosher salt enhances the natural flavors. For extra depth, I add 2 minced garlic cloves and 1 tsp fresh ginger—these aromatics elevate the dish from simple to restaurant-worthy. 🌶️
Sweet-Savory Balance
If you prefer a slightly sweeter profile, increase the sugar to 1.5 tsp and add a pinch of red pepper flakes for subtle heat. For a tangier twist, swap the rice vinegar for 1 tbsp lemon juice—this brightens the dish beautifully.
The key is to taste as you go: the glaze should coat the back of your tongue with umami while leaving your palate refreshed. I often adjust the sugar first, then the vinegar, to achieve harmony.
Umami Boosters
For an extra umami punch, stir in 1 tsp soy sauce or ½ tsp fish sauce (if vegetarian, use 1 tsp coconut aminos). These ingredients deepen the savory notes without overpowering. Another trick?
Toast 1 tsp sesame seeds in a dry pan until golden and fold them into the glaze—this adds nutty complexity. The beans will absorb these flavors beautifully, creating a sauce that clings perfectly to each crisp-tender bite.
Finishing Touches
The final step is where the dish comes together visually and texturally. After tossing the beans with the glaze, sprinkle with 1 tbsp toasted sesame seeds for crunch and a golden finish.
For a pop of color, add ½ tsp turmeric to the glaze before tossing—it enhances the green beans' vibrancy while adding earthy warmth. Garnish with thinly sliced scallions for freshness, or a drizzle of chili oil for heat lovers.
These details make the dish look as impressive as it tastes. ✨
Sauce Variations
For a spicy miso glaze, add 1 tsp gochujang (Korean chili paste) to the sauce—it adds a smoky, fiery kick. For a creamy version, stir in 1 tbsp tahini or 2 tbsp coconut cream after heating the glaze.
If you're serving this as a vegan main, boost the sauce with 1 tbsp nutritional yeast for a cheesy, umami-rich note. Each variation keeps the core technique intact while offering a fresh twist on the classic flavors.
Storage and Reuse
The miso glaze can be made ahead and stored in an airtight container in the fridge for up to 5 days. Reheat gently over low heat, stirring until smooth.
For leftovers, store the tossed green beans in the fridge for 2 days, but reheat them in a skillet with a splash of water to restore crispness. The glaze also works wonders on tofu, mushrooms, or even grilled vegetables—it’s incredibly versatile! 💡
Nutrition facts
Frequently asked questions
Can I use frozen green beans instead of fresh?
Yes, but with a few adjustments! Thaw frozen beans completely first, then pat them very dry with a towel to remove excess moisture. Since frozen beans have more water content, you may need to increase the blanching time by 1 minute to ensure they're tender-crisp. The miso glaze will still cling beautifully, but the texture will be slightly softer than with fresh beans.
How do I make this recipe gluten-free?
This recipe is naturally gluten-free as long as you use certified gluten-free miso paste. Most white miso brands are gluten-free, but always check the label. The only other potential gluten source would be soy sauce (if substituting), so opt for tamari instead. All other ingredients in this recipe are inherently gluten-free.
What if my miso glaze is too salty?
Don't worry—this happens more often than you'd think! To balance overly salty miso, stir in ½ tsp additional sugar or 1 tsp rice vinegar to cut through the saltiness. For a more dramatic fix, add 1 tsp lemon juice or a pinch of baking soda (just a tiny amount!) to neutralize the salt. Taste as you go to avoid overcorrecting.
Can I make this ahead of time for meal prep?
Prep the miso glaze ahead and store it in an airtight container for up to 5 days. For the beans, blanch and shock them, then store separately in the fridge for 2 days. When ready to serve, simply reheat the glaze gently and toss with the beans. For best texture, reheat the beans in a skillet with 1 tsp oil over medium heat for 2-3 minutes to restore crispness.
What other vegetables pair well with this glaze?
This versatile miso glaze works beautifully on asparagus, broccoli, or Brussels sprouts—just adjust the blanching time slightly. For heartier options, try tossing with shredded cabbage or sliced mushrooms. The key is to use firm vegetables that hold their shape during the quick cooking process. The same glaze ratio works well for all these options!