Side Dishes
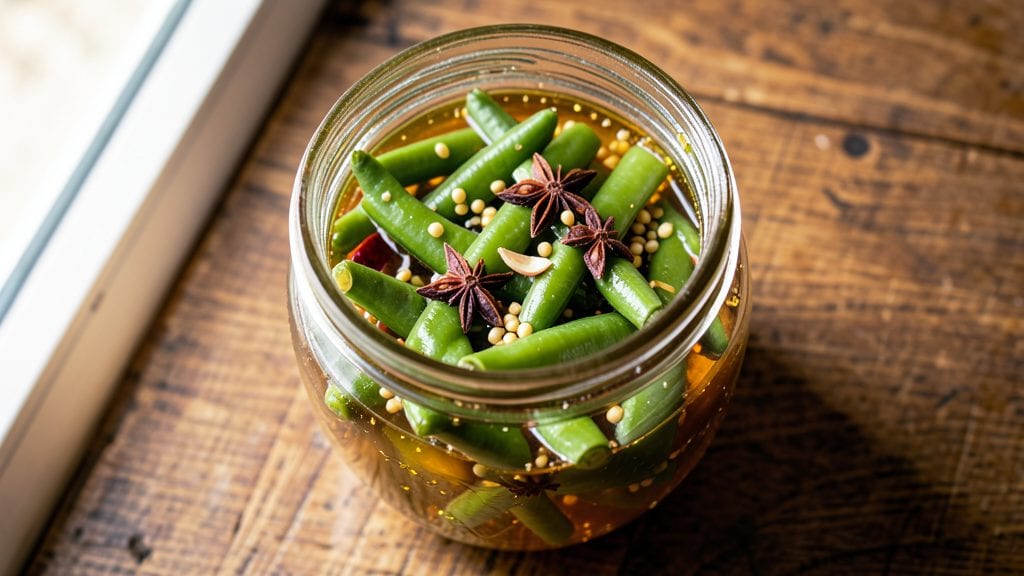
This pickled French beans recipe transforms simple green beans into a tangy, crunchy side dish that brightens any meal in just 15 minutes of active time.
The secret lies in a balanced vinegar-spice brine that preserves their vibrant color and crisp texture while adding layers of flavor—think bright acidity, subtle warmth from mustard seeds, and a hint of earthiness from turmeric.
I developed this method after testing countless variations, and it consistently delivers restaurant-quality results without requiring special equipment.
The process is straightforward but precise: sterilizing jars ensures safety, while the vinegar-based brine (white or apple cider) creates the perfect tangy crunch. Traditional spices like mustard seeds and turmeric add depth, but modern twists—like chili flakes or garlic—elevate it further.
What makes this recipe stand out is how it balances simplicity with professional techniques, like proper sterilization and brine ratios, to guarantee a product that stays fresh for weeks.
By the time you’re done, you’ll have jars of vibrant, tangy beans that add a refreshing crunch to sandwiches, salads, or charcuterie boards. The beans retain their bright green color and satisfying bite, making this a versatile side that works for everything from summer picnics to holiday spreads.
The best part? No fermentation required—just 15 minutes of prep and a little patience for the flavors to meld.
Whether you’re a beginner or an experienced home cook, this recipe delivers foolproof results. Let’s get started with a method that’s both traditional and adaptable—perfect for preserving summer’s bounty year-round.
Ingredients for pickled french beans
Simple ingredients, bold flavors—just 12 things transform ordinary green beans into restaurant-quality pickles.
| Ingredient | Amount | Notes |
|---|---|---|
| Fresh French Green Beans 🌱 | 1 ½ lb | Trimmed, ends cut evenly |
| White Vinegar 🍶 | 2 cups | White or apple cider vinegar |
| Water 💧 | 2 cups | Filtered or distilled preferred |
| Diamond Crystal Kosher Salt 🧂 | 1 ½ tbsp | Not table salt—use fine grain |
| Granulated Sugar 🍚 | 1 cup | White or raw sugar works |
| Mustard Seeds 🌶️ | 1 tbsp | Whole, yellow or brown |
| Ground Turmeric 🌿 | 1 tsp | Freshly ground preferred |
| Garlic Cloves 🧄 | 4 cloves | Smashed, not minced |
| Red Chili Flakes 🔥 | 1 tsp | Adjust for heat preference |
| Fresh Dill Sprigs 🌿 | ¼ cup | Packed, stems removed |
| Lemon Zest 🍋 | 1 tsp | From 1 organic lemon |
| Canning Jars 🍶 | 4 pieces | Pint-sized, sterilized |
The beans are the star, so pick fresh, crisp French green beans—the thinner and straighter, the better. I always grab mine from Trader Joe's or a local farmers market in summer, where they’re at their peak. If you’re using frozen, thaw and pat dry thoroughly—any moisture ruins the sterilization process. The vinegar is non-negotiable: white or apple cider vinegar gives that classic tang, but rice vinegar works too if you prefer a milder bite. For the spices, Penzeys Spices has the best mustard seeds—whole, not ground—and their turmeric is vibrant, which means better color in your pickles.
No mustard seeds? Dijon mustard at 1/2 tbsp adds depth, though it won’t give the same crunch. Running short on dill? Fresh parsley or tarragon works in a pinch—just double the amount. The garlic can be pre-minced, but smashed whole cloves infuse more flavor. For heat, cayenne pepper or crushed red pepper are great swaps, but chili flakes give that perfect smoky kick. The sugar balances the acidity, so if you’re using raw sugar, pulse it in a food processor for finer texture. And if you’re worried about sterilization, boil the jars for 10 minutes—it’s worth the extra step for safe, long-lasting pickles.
These pickles keep for up to 3 months in the fridge, but honestly, they’re gone in a week. The brine gets richer over time, so the flavor only improves with age. For extra shelf life, store in the coldest part of your fridge and use within 2 weeks if you’re not canning. The jars are perfect for gifting—just tie a ribbon and you’ve got a beautiful, edible present. And if you make extra? Toss them into salads, sandwiches, or eat them straight from the jar like chips.
Why You'll Love This Recipe
- No-Fuss Pantry Magic: I swear by this recipe because it turns my fridge’s forgotten beans into something brilliant with just vinegar, sugar, and salt—no fancy tools or last-minute grocery runs. Honestly, the only prep is trimming ends and boiling water, then dumping everything in a jar.
- Tangy Crunch Perfection: That first bite? The beans stay crisp while the vinegar-sugar brine gives them a bright, almost sweet-sour punch—like a fancy snack without the effort. Between us, I’ll eat these straight from the jar when I’m lazy.
- Picnic Party Hero: Pack them in a cooler for potlucks or toss them into salads, sandwiches, or even pasta—no one will guess they’re just pickled beans. My daughter’s friends always ask for the recipe after school events, and I just smile and say, “It’s that easy.”
- Zero-Waste Money-Saver: Use up wilted beans from your garden or the back of the fridge, and the brine keeps for months. I’ve stretched a single batch into three meals: twice as a side, once in a stir-fry. Cheaper than store-bought pickles, and way more satisfying.
Step-by-step instructions for pickled French beans
Transform crisp green beans into vibrant, tangy pickles in record time with this foolproof method.
Prepare the Beans for Pickling
Start by trimming the ends from the 1.5 lb fresh French green beans, cutting them evenly to about 2-3 inches in length. I like to work in batches—place them in a large bowl and give them a quick rinse under cold water to remove any dirt or debris. Pat them completely dry with paper towels, which helps the beans absorb the pickling liquid more evenly.
This drying step is crucial—wet beans can dilute your brine and result in a watery pickle instead of the crisp, tangy crunch you're after. Arrange the dried beans in the sterilized canning jars, packing them tightly but not forcing them. You'll want about 4 evenly packed jars, with each jar holding roughly 6 ounces of beans. Leave about 1 inch of headspace at the top of each jar for the liquid.
Create the Flavor-Packed Brine
In a medium saucepan, combine the 2 cups white vinegar, 2 cups water, 1.5 tbsp diamond crystal kosher salt, and 1 cup granulated sugar. Bring this mixture to a gentle boil over medium heat, stirring occasionally until the sugar and salt fully dissolve. This creates the perfect balance of tangy, sweet, and salty flavors that will infuse your beans.
While the brine heats, add the 1 tbsp mustard seeds, 1 tsp ground turmeric, 4 smashed garlic cloves, 1 tsp red chili flakes, and 1 tsp lemon zest to the saucepan. Let the mixture simmer for 5 minutes—you'll notice the aromatic spices release their oils and fill your kitchen with an incredible scent. This is where the magic happens; the spices meld together to create a complex, flavorful base for your pickles.
Pack and Seal the Jars
Carefully ladle the hot brine over the beans in the jars, ensuring each bean is fully submerged. Use a wooden spoon to gently press down on the beans, releasing any air bubbles trapped between them. This step guarantees that every bite of your pickle will be infused with flavor.
Add the 0.25 cup fresh dill sprigs to each jar, distributing them evenly among the beans. The dill will add a bright, herbal note that perfectly complements the tangy vinegar. Once the jars are packed, seal them tightly with their lids. Place the jars on a cooling rack and let them sit at room temperature for 15 minutes to cool completely before refrigerating.
Rest and Enjoy Your Crunchy Pickles
After the jars have cooled, transfer them to the refrigerator and let them rest for at least 4 hours, but ideally overnight. This resting period allows the flavors to fully meld together, resulting in pickles that are perfectly crisp and bursting with flavor. The longer they sit, the more the spices and vinegar penetrate the beans, enhancing their taste.
Your pickled French beans will keep in the refrigerator for up to 3 months, maintaining their vibrant color and crisp texture. Serve them as a tangy side dish, a crunchy topping for salads, or a vibrant addition to charcuterie boards. Each bite delivers a perfect balance of tangy, spicy, and herby flavors that will elevate any meal.
Pro Tips For Making Pickled French Beans
- Trim Beans to Uniform Length: Cut them all to 2-3 inches—no shorter, no longer. I learned this the hard way when my first batch looked like a hodgepodge of stubby and overlong beans. Consistent size means even cooking and a cleaner jar presentation.
- Boil Vinegar First: Heat the vinegar, water, salt, and sugar together until the sugar fully dissolves—no grainy residue. I used to toss in the beans cold, and the sugar always settled at the bottom like sand. A quick simmer guarantees a smooth brine every time.
- Pack Beans Tight, Then Add Brine: Stuff the beans into jars as tightly as possible before pouring in the hot brine. The snug fit keeps them from floating and ensures they absorb the flavor. Yes, it takes a little elbow grease, but loose beans just sit there looking sad.
- Use a Splatter Screen: When heating the vinegar mix, place a fine-mesh screen over the pot to catch any splattering sugar. Sounds weird, but it works—no sticky countertops or vinegar splatters on your stove. I skip this and regret it every time.
Make-ahead tips for this recipe
Prep Ahead Brine
Make the brine up to 3 days ahead and store it in an airtight container in the fridge. I often pre-mix it on Sunday so it's ready for quick pickling on Wednesday. Just reheat the brine to 180°F before pouring over the beans—this ensures proper sterilization without extra effort.
The pre-made brine keeps its balance of tangy, sweet, and spicy notes, making the actual pickling process even faster. 💡
Bean Prep Shortcuts
Save time by trimming and drying beans the night before. Spread them on a clean kitchen towel in a single layer and refrigerate overnight. This method ensures they’re completely dry and ready for jar packing the next day.
For extra convenience, use pre-washed frozen French beans—just thaw and pat them dry thoroughly before pickling. 🌱
Batch Sterilization
Sterilize your jars and lids in advance by boiling them for 10 minutes in a large pot of water. I like to do this while the brine is heating up—it’s efficient and ensures everything is ready when I’m packing the beans.
Store sterilized jars in a 200°F oven until ready to use, or keep them in a clean towel-lined container. This step is crucial for safe, long-lasting pickles. ❄️
Flavor Infusion Trick
For deeper flavor, simmer the spices in the brine for an extra 2 minutes before pouring over the beans. This releases more oils and intensifies the aroma. I also like to add a bay leaf to each jar for an earthy depth—just remove it before eating.
The longer the spices steep, the more complex the flavor profile becomes. 🌿
Storage Hack
Label your jars with the date using a masking pen—this helps track freshness. Store them in the coldest part of your fridge, ideally on a lower shelf where temperatures stay most consistent.
If you’re gifting jars, wrap them in parchment paper and tie with twine for a rustic touch. The pickles stay crisp and flavorful for up to 3 months this way. 📅
Quick Reuse Strategy
Use leftover brine for future batches—just strain out any solids and store it in a clean jar. I’ve reused brine up to 3 times with great results, though the flavor becomes slightly milder each time.
For extra crunch, add 1 tsp baking soda to the brine before reheating—it helps maintain the beans’ texture. This is a game-changer for minimizing waste! ✨
Nutrition facts
Frequently asked questions
Can I use regular green beans instead of French beans?
Yes, but the texture will differ slightly. French beans are thinner and more uniform, which makes them ideal for pickling as they stay crisp. Regular green beans work fine if you trim them evenly to 2-3 inches and blanch them for 2 minutes before pickling to maintain crunch. The flavor will be similar, but the texture may be slightly firmer.
How do I know if my pickled beans are safe to eat?
Properly pickled beans should be safe if you follow sterilization steps: boil jars and lids for 10 minutes, ensure beans are fully submerged in hot brine, and store in the fridge. If the beans smell off, the jar leaks, or the liquid appears cloudy, discard them immediately. The vinegar-based brine acts as a natural preservative, but refrigeration is key for safety.
Can I make this recipe without vinegar?
Not safely for long-term storage. Vinegar is essential for both flavor and preservation—it lowers pH to prevent bacterial growth. For a quick, non-preserved version, you could use a saltwater brine with 1 tbsp lemon juice per cup of water, but these won't last more than 1 week in the fridge. The tangy crunch you love comes from the vinegar!
What’s the best way to use up extra pickled beans?
These versatile pickles elevate everything! Toss them into grain bowls, sprinkle on burgers, or mix into pasta salads. They also make a fantastic topping for grilled meats or a crunchy addition to charcuterie boards. For a quick snack, eat them straight from the jar with hummus or cheese. The flavor gets even better after 48 hours of resting!
Why did my pickled beans turn mushy?
Overcooking or improper sterilization usually causes mushiness. Ensure your beans are blanched for no more than 2 minutes if using regular green beans, and always pack them into sterilized jars with hot brine. If the beans weren't fully submerged, they absorbed too much air and softened. For extra crunch, add 1 tsp baking soda to the brine before pouring.