
Desserts
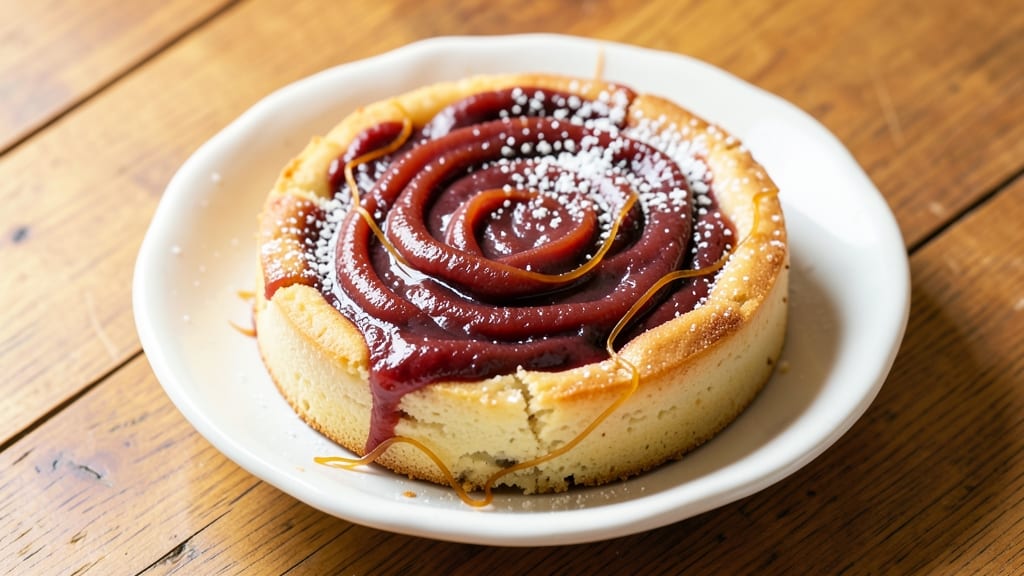
This gluten-free red bean cake transforms traditional Japanese anko into layers of silky, moist cake with a crunchy almond topping—proof that comfort desserts can be both nostalgic and modern.
The secret lies in perfectly balanced sweetness and texture, where tender red bean paste meets delicate gluten-free layers for a dessert that feels indulgent yet refined. I developed this recipe after years of experimenting with vegan adaptations, ensuring every bite delivers that signature melt-in-your-mouth experience without compromising structure.
What sets this apart is the two-stage baking process: first, the almond crust bakes into a golden, crunchy shell, then the bean cake layers rise to create a light, airy interior. No special equipment is needed—just a standard oven and patience for the red bean paste to thicken properly.
The result? A cake that's rich in flavor but light enough to enjoy as a morning treat or afternoon pick-me-up, all while staying true to its traditional roots.
The final product is a gluten-free masterpiece with a velvety red bean center, crisp almond top, and subtle sweetness that lingers. Whether you're adapting for dietary needs or simply craving a showstopping dessert, this recipe delivers restaurant-quality layers without the fuss.
The almond crust adds texture contrast, while the bean filling remains perfectly moist—no dry crumbs in sight.
Perfect for celebrations or everyday cravings, this cake keeps beautifully for up to 5 days when stored properly. For extra flair, drizzle with melted dark chocolate or dust with powdered sugar before serving. Let's create this elegant yet approachable dessert together.
Ingredients for red bean cake
Gluten-free flour blend meets velvety red bean paste for layers of comfort with almond crunch.
| Ingredient | Amount | Notes |
|---|---|---|
| Sweet Red Bean Paste (Anko) 🍫 | 1 ½ cups | High-quality, store-bought or homemade |
| All-Purpose Gluten-Free Flour Blend 🌾 | 2 cups | Bob's Red Mill 1:1 preferred |
| Granulated Sugar 🍚 | 1 ¼ cups | Organic preferred for refined flavor |
| Unsweetened Almond Milk 🥛 | 1 cup | Silk brand for creamy texture |
| Apple Cider Vinegar 🍏 | 1 tbsp | For tenderizing gluten-free batter |
| Baking Powder 🍞 | 1 ½ tsp | Gluten-free certified |
| Salt 🧂 | ½ tsp | Diamond Crystal kosher |
| Ground Almonds 🥜 | 1 ½ cups | Finely ground for almond crust |
| Light Brown Sugar 🍚 | ½ cup | Packed for almond crust |
| Melted Coconut Oil 🫒 | ½ cup | Unrefined for rich flavor |
| Vanilla Extract 🌸 | 1 tsp | Pure Madagascar bourbon |
| Powdered Sugar 🍚 | ¼ cup | For dusting finished cake |
| Dark Chocolate Chips 🍫 | ½ cup | 70% cacao, melted for drizzle |
The red bean paste is non-negotiable here—Mae Kluay or Hana Kogi brands deliver that authentic, silky texture. If making your own, simmer azuki beans with sugar until ultra-smooth (about 2 hours). For the gluten-free flour, Bob's Red Mill 1:1 is your best bet—it bakes like regular flour without gummy results. The almond milk should be unsweetened; Silk or Califia Farms work best for that creamy consistency. Pro tip: Toast your ground almonds for 5 minutes before mixing—they'll develop deeper flavor and crisp up better in the crust.
No almond milk? Oat milk works in a pinch, but it's slightly thinner. Running short on red bean paste? Substitute with mashed sweet potato mixed with powdered sugar (though texture will differ). The apple cider vinegar might seem odd, but it's key for activating the gluten-free baking powder properly—don't skip it. For the almond crust, raw almonds ground in a food processor give the best texture, but pre-ground almond flour from Trader Joe's saves time. The brown sugar should be packed—lightly tap the measuring cup to eliminate air gaps. And yes, that unrefined coconut oil makes a difference in the final richness.
This cake keeps beautifully for 5 days when stored in an airtight container at room temperature, though the almond crust stays crispest within the first 2 days. For longer storage, wrap tightly and freeze for up to 3 months. The red bean filling actually improves overnight as flavors meld. To serve, dust with powdered sugar right before cutting—it melts into the warm cake. Leftovers? Reheat slices in a 350°F oven for 5-7 minutes to restore that almond crunch. Trust me, the second slice is always better.
Why You'll Love This Recipe
- No-Fuss Mixing: I swear by this batter—just whisk the gluten-free flour, almond milk, and a splash of vinegar until smooth. No eggs, no fuss, and the anko does all the heavy lifting with its natural sweetness.
- Creamy-Crunch Contrast: That velvety anko swirled into the tender crumb? It’s like biting into a cloud with a surprise of soft, jammy goodness. (Yes, even on a Tuesday night.)
- Tea Time Hero: Serve it warm with green tea for a Japanese café vibe, or cut into squares for a snack that feels fancy but costs pennies. My kids grab these before soccer practice—no guilt, just joy.
- Lasts All Week: Bake a batch Sunday, and you’ve got breakfast, dessert, or a quick snack covered. The texture stays perfect for days, and the almond milk keeps it from drying out like some store-bought cakes.
Step-by-step instructions for silky gluten-free red bean cake
Here's how to create layers of velvety red bean filling between crisp almond crusts—no gluten in sight.
Whisk Together the Wet Ingredients for the Cake Batter
In a large mixing bowl, combine the 1.5 cups sweet red bean paste (anko) with the 1 cup unsweetened almond milk and 1 tbsp apple cider vinegar. I like to use a whisk here to break up any lumps in the anko while incorporating the vinegar, which tenderizes the gluten-free flour later. The mixture should be smooth but still thick—think of it like a rich, sweet pudding consistency.
Next, add the 1.25 cups granulated sugar and 1 tsp vanilla extract, whisking until fully dissolved. This step ensures even sweetness throughout the batter. The sugar should completely melt and integrate, creating a glossy, homogeneous mixture. If you notice any sugar granules clinging to the sides, give the bowl a quick tap to dislodge them before proceeding.
Combine Dry Ingredients and Create the Batter
In a separate medium bowl, sift together the 2 cups all-purpose gluten-free flour blend, 1.5 tsp baking powder, and 0.5 tsp salt. Sifting prevents lumps and ensures even distribution of the leavening agent, which is crucial for a light texture in gluten-free baking. I always sift a second time after adding the dry ingredients to guarantee maximum aeration.
Gradually pour the dry mixture into the wet ingredients while whisking constantly on medium speed. The batter will initially look curdled, but keep whisking for about 1 minute until it smooths out and thickens slightly. You're aiming for a consistency similar to heavy cream—thick enough to leave a trail when you lift the whisk but still pourable. If it seems too thick, add 1-2 tablespoons of almond milk to loosen it.
Prepare the Almond Crust Mixture
In another bowl, combine the 1.5 cups ground almonds, 0.5 cup light brown sugar, and 0.5 cup melted coconut oil. The brown sugar should be packed—don't scoop it directly from the bag, or you'll get less than you need. Use your fingers to work the mixture until it forms a coarse, crumbly texture that holds together when pressed. This crust is what gives the cake its signature crunch between each layer.
Press about 1/3 of this almond mixture firmly into the bottom of a 9-inch round cake pan (about 1/4-inch thick). Use the bottom of a measuring cup to press it evenly, creating a solid base. The crust should be compact but not packed too tightly—you want it to stay together when you remove the cake later. Sprinkle a thin layer of the remaining almond mixture over the base to prevent sticking.
Layer and Bake the Cake
Pour half of the prepared batter over the almond crust in the pan, spreading it evenly with a spatula. The batter should cover the entire surface but not overflow the sides. Sprinkle about 1/4 cup of the remaining almond mixture evenly over the batter, then add the second half of the batter. Top with the final 1/4 cup almond mixture, pressing it lightly to adhere. This creates the signature layered effect.
Preheat your oven to 350°F and bake the cake for 40-45 minutes, or until a toothpick inserted into the center comes out clean. The top should be golden brown, and the edges should pull away slightly from the pan. If the top browns too quickly, tent the cake with foil after the first 20 minutes to prevent over-browning while ensuring the center cooks through.
Finish with Chocolate and Dust with Powdered Sugar
Remove the cake from the oven and let it cool in the pan for 10 minutes. While it's still warm, melt the 0.5 cup dark chocolate chips in a microwave-safe bowl in 30-second intervals, stirring between each interval until completely smooth. The chocolate should be glossy and free of any streaks or unmelted pieces.
Drizzle the melted chocolate evenly over the top of the cake, letting it seep into the almond crust. Once completely cooled (about 1 hour), dust the top generously with 0.25 cup powdered sugar using a fine-mesh sieve. This final step adds a delicate sweetness that balances the rich red bean filling. Serve at room temperature for the best texture contrast between the silky layers and crisp crust.
Pro Tips For Making Red Bean Cake
- Whisk the Almond Milk: Heat the unsweetened almond milk with the vinegar first—just until tiny bubbles form at the edges. This mimics the curdling action of dairy and makes the batter silky instead of gummy, especially with gluten-free flour blends that can get clingy. (Yes, even if you’re impatient like me.)
- Mash the Anko: Don’t just scoop the red bean paste straight from the jar—mash it roughly with a fork before mixing. This breaks up any lumps and distributes the sweetness evenly, so every bite has that classic smooth texture instead of pockets of goo or dryness. Think of it as giving the paste a quick handshake.
- Test the Oven Early: Preheat your oven to 350°F, but slide a cake pan in for 5 minutes first to warm it up. Gluten-free batters set faster and can stick if the pan’s cold, especially when using almond milk. A quick warm-up guarantees clean release and even baking—no scrubbing later.
- Fold, Don’t Stir: Once you add the flour blend, fold it in with a spatula in broad, gentle strokes instead of stirring vigorously. Overmixing develops gluten-like toughness in gluten-free flours, turning your cake dense instead of light. Think "gently coax" rather than "beat into submission."
Wine and beer pairings for this red bean cake
Japanese Sake Pairing
A dry junmai daiginjo sake like Dassai 23 from Niigata is my go-to choice for this cake. Its crisp, clean finish with subtle floral notes complements the red bean's natural sweetness without overpowering the delicate almond crust.
Serve it chilled at 45-50°F to enhance the contrast between the warm cake and cool beverage. The sake's acidity also helps cut through the richness of the coconut oil and dark chocolate topping. 🍶
Sweet Sparkling Wine
For a celebratory touch, pair with a semi-dry Moscato d'Asti—its effervescence and light fruitiness mirror the cake's texture and sweetness. I recommend Saracco or La Giustiniana brands, served at 45°F in small glasses.
The bubbles cleanse your palate between bites, making each layer of cake feel fresh and indulgent. This pairing works especially well for special occasions or when serving to guests unfamiliar with traditional Japanese desserts.
Rich Dessert Beers
If you prefer beer, a Belgian-style dubbel with notes of caramel and vanilla enhances the cake's flavors beautifully. Try Westmalle Dubbel or Chimay Blue, both of which have a malty depth that pairs wonderfully with the red bean's earthy undertones.
Serve at 50-55°F to balance the beer's richness with the cake's crisp almond crust. The beer's slight bitterness also provides a refreshing contrast to the sweetness. 🍺
Coffee Pairing
For a more traditional approach, serve with a lightly roasted Japanese matcha latte or a single-origin Ethiopian coffee brewed medium-dark. The earthy, slightly bitter notes of the coffee complement the red bean's natural sweetness while the creaminess of the latte enhances the cake's texture.
I recommend a 3-4 oz pour of coffee to avoid overwhelming the delicate dessert. This pairing is perfect for afternoon tea settings or as a comforting evening treat.
Non-Alcoholic Options
For those avoiding alcohol, a sparkling yuzu soda or hibiscus iced tea offers refreshing contrast. Mix yuzu juice with sparkling water and a touch of honey for a citrusy, effervescent drink that brightens the cake's flavors.
Alternatively, brew hibiscus tea with a pinch of cinnamon and serve chilled—its tartness balances the sweetness beautifully. Both options are perfect for family gatherings or daytime celebrations. 💧
Nutrition facts
Frequently asked questions
Can I make this red bean cake without gluten-free flour?
Yes, but the texture will differ. Replace the gluten-free blend with 2 cups all-purpose flour and add 1 extra tablespoon of baking powder to compensate for the lost structure. The cake will be denser but still delicious—great for a quick version when you don't have gluten-free options.
How do I fix if my red bean paste is too thick or too thin?
If your paste is too thick, whisk in 1-2 tablespoons of almond milk to loosen it. For thin paste, simmer it uncovered over low heat for 5-10 minutes to thicken naturally. Never add extra sugar—it alters the flavor balance. Stir constantly to prevent scorching.
Can I substitute almond milk with another liquid?
Use soy milk or oat milk as direct substitutes—they work well for moisture. Avoid water or dairy milk, as they can make the cake too dense. For extra richness, try coconut milk, but reduce the sugar slightly since it's naturally sweet. The texture will be slightly different but still delicious.
Why did my cake turn out dry instead of moist?
Overbaking is the most common cause—check with a toothpick at 35-40 minutes. If the batter was too thick, add 1 extra tablespoon of almond milk before baking. For extra moisture, brush the warm cake with simple syrup (equal parts sugar and water) before dusting with powdered sugar.
How do I store leftovers to keep them fresh?
Wrap tightly in plastic wrap, then place in an airtight container at room temperature for up to 5 days. For longer storage, freeze slices for 3 months. Thaw overnight in the fridge and reheat for 5 minutes at 350°F to restore crispness. The almond crust stays best within 2 days of baking.