
Beverages
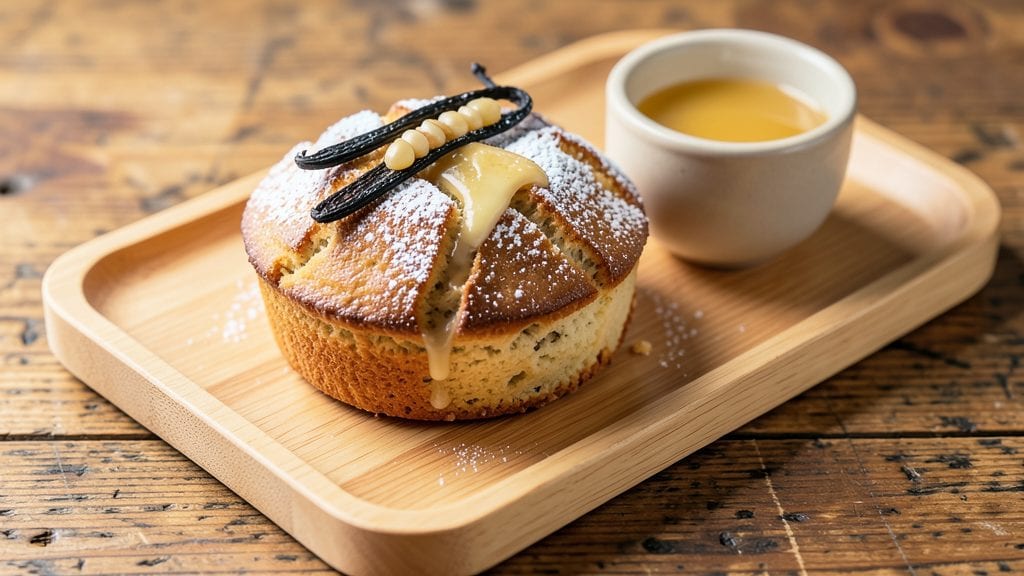
Recreating Starbucks petite vanilla bean scones at home delivers that signature buttery crumb and delicate vanilla sweetness you crave. The secret lies in scraping real vanilla bean pods for maximum flavor, then folding in cold butter for tender layers that stay light despite their richness.
I’ve perfected this recipe after testing dozens of variations—no more dry, crumbly scones that fall apart.
This recipe delivers Starbucks-quality scones with a golden, crackly top and a crumb so tender it melts in your mouth. The key techniques—chilling the dough, cutting with a sharp knife, and baking in a preheated oven—ensure even baking and that signature texture.
Unlike many recipes, these scones stay moist for hours, making them perfect for breakfast or afternoon tea.
What sets these apart is the vanilla bean infusion, which gives them that signature Starbucks aroma and flavor without overpowering the buttery base. The dough comes together in 10 minutes, then rests while you prep the oven—ideal for a quick weekend baking project.
Each bite balances sweetness with buttery richness, just like the café version.
Serve warm with a pat of butter or a drizzle of vanilla glaze for that extra touch. These scones freeze beautifully too, so you can bake a batch ahead for busy mornings. Let’s get baking—your kitchen will smell like a Starbucks bakery in no time.
Ingredients for starbucks petite vanilla bean scone
Buttery, tender, and infused with real vanilla—just like Starbucks but better.
| Ingredient | Amount | Notes |
|---|---|---|
| All-Purpose Flour 🌾 | 4 cups | Sifted for light texture |
| Granulated Sugar 🍚 | ½ cup | Divided for dough and glaze |
| Unsalted Butter 🧈 | 1 cup | Cold, cubed for tenderness |
| Vanilla Bean Pods 🌿 | 2 whole | Seeds scraped for infusion |
| Baking Powder 🧂 | 1 tbsp | Freshly opened for lift |
| Salt 🧂 | ½ tsp | Fine sea salt preferred |
| Heavy Cream 🥛 | ½ cup | Cold for flaky layers |
| Milk 💧 | ½ cup | Room temperature for blending |
| Vanilla Extract 🍯 | 1 tsp | Pure vanilla for depth |
| Powdered Sugar 🍚 | ¼ cup | For glaze, sifted smooth |
| Lemon Zest 🍋 | 1 tsp | Brightens flavor profile |
| Vanilla Glaze 🍯 | ½ cup | Store-bought or homemade |
The vanilla bean pods are non-negotiable here. Trader Joe’s or specialty grocers like Whole Foods carry high-quality pods—look for plump, dark seeds inside. If you can’t find them, Madagascar Bourbon beans are the next best thing. Scrape every last seed and save the pod for tea! The butter needs to be cold—take it out of the fridge right before mixing, but don’t let it soften. For flour, King Arthur or Bob’s Red Mill brands bake up lighter. Sift everything to avoid dense scones—trust me, it’s worth the extra minute.
No vanilla bean pods? 2 teaspoons vanilla extract plus 1 teaspoon vanilla sugar works in a pinch (vanilla sugar = blend powdered sugar with vanilla bean seeds). Swap heavy cream for half-and-half if needed, but the fat content matters for that melt-in-your-mouth crumb. For the glaze, store-bought vanilla glaze saves time, but homemade (powdered sugar + milk + vanilla) tastes fresher. The lemon zest can be skipped if you’re not a fan, but it cuts through the sweetness beautifully. If your dough feels too sticky, add 1 tablespoon more flour—just don’t overdo it or the scones will dry out.
These scones stay fresh for 3 days at room temperature, wrapped in a towel to keep them soft. For longer storage, freeze the unbaked dough on a tray, then transfer to a bag—bake straight from frozen, adding 2-3 minutes. The glaze hardens when chilled, so bring them to room temp before serving. Double the recipe and freeze half—perfect for lazy mornings. Pro tip: Brush warm scones with melted butter right out of the oven for extra richness.
Why You'll Love This Recipe
- No-Fuss Mixing: I swear by the "cut butter into flour" method—no food processor needed. Just a fork and your palms, and you’re done in five minutes. That’s how Starbucks keeps it simple, and now you can too.
- Vanilla Bomb: The real star? Scraping seeds from a vanilla bean pod straight into the dough. That deep, floral sweetness isn’t just flavor—it’s luxury in every bite, and it costs way less than a café run.
- Breakfast or Snack: These little guys work for everything: toast them with jam for breakfast, pack them in lunchboxes, or serve them warm with coffee. Honestly, I’ve eaten them cold at 10 PM and still craved more.
- Budget Bakery: A single vanilla bean lasts for months, and you’re using basic pantry staples. No fancy add-ins, no waste—just golden, crumbly scones that feel fancy without breaking the bank. My wallet thanks me every time.
Step-by-step instructions for Starbucks petite vanilla bean scones
Here's how to create those signature Starbucks-style scones with tender crumb and buttery layers.
Prepare the Vanilla Bean Infusion
In a small saucepan, combine the 0.5 cup heavy cream with the 2 whole vanilla bean pods. Bring to a gentle simmer over medium heat and let it steep for 5 minutes. This allows the vanilla seeds to infuse the cream deeply. Remove from heat and let it cool completely before using. The pods should be soft when pressed - this means they've released their flavor. Scrape out the seeds and set them aside for the dough.
While the cream cools, scrape the seeds from the vanilla bean pods using a small knife. You'll need about 1 teaspoon of seeds - save the empty pods for garnish if desired. The infusion creates that signature Starbucks vanilla flavor that's richer than regular extract. Don't skip this step - it makes all the difference in authentic flavor.
Create the Scone Dough
In a large mixing bowl, whisk together the 4 cups all-purpose flour, 1 tablespoon baking powder, and 0.5 teaspoon salt. Sift this mixture twice for a light, airy texture - this prevents dense scones. Make a well in the center and add the 1 cup unsalted butter, cut into small cubes. Use a pastry cutter or your fingers to work the butter into the flour until you have pea-sized crumbs with some larger pieces remaining.
Add the 0.5 cup granulated sugar, 1 teaspoon vanilla extract, 1 teaspoon lemon zest, and the vanilla bean seeds. Pour in the cooled vanilla-infused cream and 0.5 cup milk, mixing just until combined. The dough will be shaggy - don't overmix. Turn it out onto a lightly floured surface and gently knead just until it comes together, about 8-10 strokes. This keeps the scones tender rather than tough.
Shape and Cut the Scones
Pat the dough into a 1-inch thick rectangle on a parchment-lined baking sheet. Use a sharp 2-inch round cutter to cut out scones, pressing straight down without twisting. You should get about 12 petite scones - rework the scraps and cut again. Place them about 1 inch apart on the baking sheet. Brush the tops with a little milk for a golden finish.
For that classic Starbucks look, cut a small slit in the top of each scone with a sharp knife. This creates a decorative opening while allowing steam to escape. Chill the prepared scones in the refrigerator for 15 minutes while you preheat the oven to 375°F. This prevents excessive spreading during baking and helps maintain their shape.
Bake to Golden Perfection
Bake the scones for 12-15 minutes until they're golden brown at the edges. You'll see them puff slightly as they bake - that's normal. The centers should still look slightly underdone. Rotate the baking sheet halfway through for even baking. Immediately transfer to a wire rack to cool for 5 minutes - they'll firm up as they cool.
While still warm, brush the tops with the 0.5 cup vanilla glaze (mix 0.25 cup powdered sugar with 1-2 teaspoons milk until smooth). The glaze should be thin enough to spread easily but thick enough to coat. Let the glaze set for 5 minutes before serving. The contrast of warm scones with cool glaze creates that perfect texture combination.
Serve Warm with Coffee
Serve the scones immediately while still warm. They should be tender with a slightly crisp exterior and buttery layers throughout. The vanilla flavor should be prominent but not overpowering, with a bright lemon note from the zest. Cut into wedges to reveal those beautiful layers - that's the hallmark of a well-made scone.
These scones are best enjoyed fresh but can be stored in an airtight container at room temperature for 2 days. For longer storage, freeze the unbaked scones on a tray before transferring to a bag - they'll keep for up to 3 months. When ready to serve, bake from frozen for 15-18 minutes at 375°F. The secret to these Starbucks-style scones is the vanilla infusion and proper layering technique - follow these steps and you'll get that signature taste and texture.
Pro Tips For Making Starbucks Petite Vanilla Bean Scone
- Chill the Dough Properly: Pop the dough in the fridge for exactly 30 minutes—no more, no less. I used to rush this, and my scones turned out dense or greasy. Cold butter stays firm, and the gluten relaxes just enough to make them tender, not tough.
- Scrape the Vanilla Bean: Split the pod lengthwise and scrape out every last bit of seeds—don’t just poke a hole. The paste inside is where the real flavor hides, and skipping it means your scones taste like they’re missing something.
- Don’t Overmix the Dough: Stir the wet ingredients into the dry just until combined, then stop. After mixing with a fork for about 10 seconds, you’ll see lumps—those are fine. Overworking the dough makes scones dense and chewy, not flaky.
- Use Cold Butter, Not Room-Temp: Cut the butter into tiny cubes and toss it into the flour—don’t soften it first. Cold butter creates those coveted little pockets of air that make the scones light. If the butter melts too soon, your scones will be flat and heavy.
Essential equipment for great starbucks petite vanilla bean scone
Butter-Cutting Tools
For that signature buttery crumb, you need cold, cubed butter—not softened. I recommend using a microplane or sharp chef’s knife to cut 1 cup unsalted butter into pea-sized cubes while still frozen. A pastry blender works too, but avoid overworking the dough.
For the best texture, use European-style butter like Plugrá or Land O’Lakes European Style—they have a higher fat content (82-86%) that creates richer layers. 🧈
Precision Cutters
A sharp 2-inch round cutter is non-negotiable for those perfect Starbucks-style petite scones. I use a Wilton Non-Stick Scone Cutter because it glides through the dough without tearing. For a rustic look, try a fluted pastry wheel to create decorative edges.
Press straight down without twisting to avoid dense centers. If you don’t have a cutter, a glass or small bowl works in a pinch—just dip it in flour between cuts. 🔪
Mixing Bowls & Whisks
Use a large, deep mixing bowl (at least 5-quart capacity) to avoid spills when combining wet and dry ingredients. A stainless steel bowl keeps dough cooler longer, which is key for tender scones. For mixing, a flexible silicone spatula or wooden spoon prevents overmixing—overworking the dough makes scones tough.
A hand mixer on low speed (just until combined) saves time, but don’t pulse too long or the butter will melt. 🥄
Baking Sheets & Parchment
Line your half-sheet baking pan with parchment paper to prevent sticking and ensure even browning. A light-colored, heavy-gauge pan (like All-Clad Stainless Steel) conducts heat evenly, while dark pans can over-bake edges.
Avoid glass pans—they trap heat and can make scones gummy. For extra insurance, place the pan on the middle rack of your oven, where heat circulates evenly. 🔥
Vanilla Bean Tools
Scraping vanilla bean seeds is where the magic happens. A small, sharp knife or vanilla bean scraper (like the OXO Good Grips model) works best. Gently split the pod lengthwise and scrape out every seed—don’t rush, or you’ll miss flavorful bits.
Save the empty pods for vanilla sugar (toss them in a jar with sugar) or infused cream in future recipes. For the glaze, a fine-mesh sieve ensures smooth application. 🌿
Oven Thermometer
Ovens lie—even by 25°F! A digital oven thermometer (like Thermoworks Oven Thermometer) ensures your 375°F setting is accurate. Starbucks-style scones rely on precise heat to achieve that golden, crackly top without burning.
If your oven runs hot, reduce the temp to 350°F and add 2-3 minutes to baking time. Preheat for 15 minutes to eliminate hot spots. ⚡
Nutrition facts
Frequently asked questions
Why do Starbucks-style scones need cold butter?
Cold butter creates those signature flaky layers that melt into tender pockets when baked. If butter softens, the scones turn out dense and greasy. Always cut butter into pea-sized cubes and keep it chilled until mixing. The contrast between cold butter and warm flour creates steam during baking, which keeps the crumb light.
Can I substitute vanilla extract for vanilla bean?
You can, but you’ll miss that signature Starbucks depth. Use 2 teaspoons vanilla extract plus 1 teaspoon vanilla sugar (blend powdered sugar with scraped vanilla seeds). For best results, infuse 0.5 cup heavy cream with vanilla bean pods for 5 minutes—this mimics the café’s rich flavor profile. The pods add aromatic complexity extract can’t replicate.
How do I fix scones that spread too much?
Over-spreading happens when dough isn’t chilled long enough. Always refrigerate shaped scones for 15 minutes before baking. Use a sharp cutter and press straight down—twisting creates uneven edges. For extra insurance, bake on the middle rack at 375°F for 12-13 minutes (not until golden). A light-colored baking sheet also prevents over-browning.
Are these scones gluten-free?
No, this recipe requires all-purpose flour for the signature tender crumb. For a gluten-free version, swap for a 1:1 gluten-free flour blend (like King Arthur’s) and add 0.5 teaspoon xanthan gum if your blend lacks it. Expect a slightly denser texture—gluten-free scones won’t have the same flaky layers.
Can I make these scones ahead of time?
Bake scones 1 day ahead and store in an airtight container at room temperature. For longer storage, freeze unbaked dough on a tray, then transfer to a bag. Bake from frozen, adding 2-3 minutes at 375°F. Reheat briefly in a 300°F oven for 5 minutes to restore freshness. The glaze hardens when chilled, so bring scones to room temp before serving.